Yesena Salgado
Photo II: Period 1
Altered Portraits
1. The hardest altered portrait to create for me was all of them. I feel like it took me longer than it should have. It was taking me a while to remember how to use photoshop and I didn't know where everything was! I couldn't remember anything from photo 1!
2. If I had to choose which one was the easiest it would have to be the coloring one. All we had to do was change the picture to black and white and then back to RGB in order to have color. The thing that sucked about the coloring one was if you color over one area again, the color gets darker. So in some areas my color looks darker. Other than that this one was the easiest to do.
3. Altered portrait to the viewer means someone took an image and made little changes to it to make it more eye catching. But to the photographer this means hard work and lots of time.
4. Out of the 7 altered portraits, I am most likely going to make the hand colored black and white images or the collages. I know my work wasn't so great for these images but it was really a lot of work trying to figure out what pictures to use for these and how to use photoshop.
5. The historic significance of the sepia is to create an old looking image. We had to make the picture have an old fashion color.
6.It's important to learn how to alter portraits because you can make an image look how you want it. If you alter a picture you're basically leaving your mark on it. Anyone can alter images but the best thing is that not matter how you alter it, its always going to have your unique style.
7. I personally don't think all portraits should be altered because some pictures look very beautiful without anything being done to it. All you can do is maybe change the lighting or the color just a tiny bit but some pictures are really pretty once they were taken.
8. By altering an image it allows you to make the image your own. It allows you to leave your mark on the picture and make it how ever you want. It can be your unique style.
Hand Colored Black & Whites


Cyanotype

Sepia


Image Overlay


Backlit Image


Collage


Cracked Face


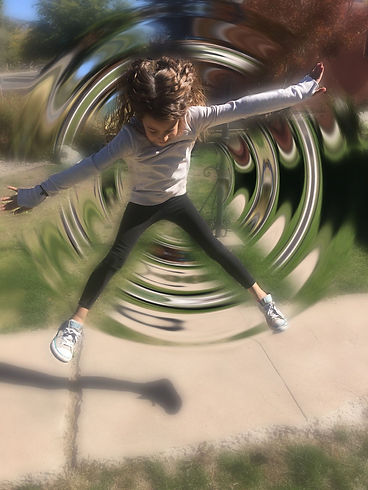
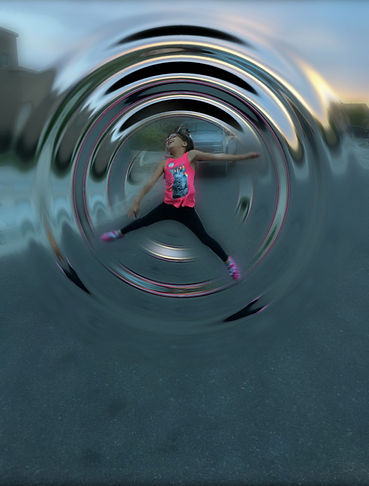
Blur Motion
1. Blur motion is when you take a picture of a person or thing and the subject is blurry. Not only does the subject have to be blurry, the background could also be focused meanwhile the subject is in focus. This was not easy to do at all.
2. Creating these images with the camera was pretty stressful. We had to change the shutter speed to a very low number in order to get the image how we wanted it. We needed to play with the flash. If the flash wasn't on the image looked to dark. But if the flash was on the image looked pretty good.
3. I didn't do very much to my images in photoshop. I just changed the color and play with the lighting. I also tired my best to crop out the stuff I didn't want in my picture.
4. There were a lot of difficult things dealing with blur motion. The most hardest part was trying to get the picture to look blurry but still look clean. When the subject was spinning we would wait until we saw their face and then take the picture. At first we weren't very successful at this. Another thing we had trouble with was trying to figure out what number to put our shutter speed at.
5. The easy thing about blur motion was probably finally getting a good understanding of how to take the pictures. The last few pictures i took and posted on wix were the ones i took while still trying to learn. It was pretty difficult at first but once you get a hang out it... it becomes easier.


_JPG.jpg)


Forced Perspective

1. This is a picture of my little sister. She is laying on her tummy and holding the crack in the floor. I took the photo of her and i made some adjustments so that it would like like she was falling. In the picture it looks as if she is going to fall into the ditch.
2. This image uses forced perspective because it makes people think she is going to fall. The way the picture is angles and the way her body is motioned makes this picture pop.
3. The way i created this image was pretty easy. I just had my little sister lay flat on her tummy and act like she was holding the line. I made her act like she was scared but you cant see her face very well.
4. The thing that was most difficult about creating this image was trying to figure out how i was actually going to make it look like a forced perspective image. I didn't know how I was gonna lay her down.
5. I think the distance affected this image because if i were too close or too far her whole body wouldn't show. The picture would look really messed up.
1. This picture is of me holding a foot ball over my little sister. It looks as if she were super duper tiny and theres this huge ball over her head. Her body is in the shape of a star kind of to show that her whole body is trying to support the ball.
2. This image uses forced perspective because my sister is bigger that the ball in real life. But in this image i made it seem as though the ball were bigger than her and it was going to crush her.
3. This picture kind of took a lot of work. First i had to try a bunch of different ways to get the ball to be bigger than her and to get her arms to go around the ball. I put the ball in front of the camera so that it would look bigger. Then i made my sister scoot back until she way tiny.
4.The thing that was really hard about making this image was figuring out how far i needed to distance my sister. I also needed to know how close i needed the ball.
5. The distance definitely affected this image. If she were too close or too far the ball would either look too big or too small.


1. This image is of my fingers squeezing the sun as it went down. My fingers were really close to the camera. That was because i wanted them to look a little bit bigger than the sun.
2. This image uses forced perspective because it shows my fingers smashing the sun. In reality the sun is huge. My fingers could never actually hold the sun. But in this image they did.
3. There was really no specific way of how i took this picture. I was in the car with my mom on the way to drop off some papers and i saw the sun setting. I then thought it would be cool if it looked like i were smashing the sun. I pulled put my phone, adjusted my fingers and took the picture
4. This image wasn't really that hard to make. I really only had trouble trying to fix the lighting. I didn't want the image to be too bright.
5. The distance affected this picture because if my fingers were too close to the camera it would look like a glare. I know theres a but of a glare now but it would have been worse
1. This is a picture of me holding a cotton ball. I made it seem as if i were holding a cloud. I just grabbed a cotton ball and made it work.
2. This image uses forced perspective because it makes people think i really am holding a mini cloud. It also uses depth of field and line of sight.
3. I got a cotton ball and went outside. I put the cotton ball up in the air and took the picture. I edited it to make it seem as if there were more clouds in the sky.
4. This picture was hard to create because i didn't know what background to use.
5. The distance in this image didn't really matter. I edited the image to make it seem like there were more clouds anyways.

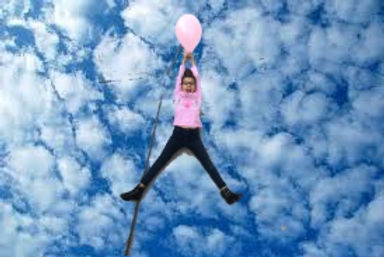
1. This picture is of my sister holding a balloon. She is laying on the floor and making it seem as if she were being lifted into the sky. Her legs are slightly spread and her arms are above her head.
2. This image uses forced perspective because it makes people think she is really flying. It tricks people into believing things that are not true. It bends gravity.
3. I created this image by having her lay on the ground. Then I blew up a balloon and gave it to her. Finally i stood on the back of my moms tall truck and took the picture.
4.This picture was hard because i needed to figure out how to place her. Also what background i was going to use.
5. Distance didn't really affected this image because if i were closer or further i would still get the same image. I was still going to edit it so it doesn't matter how close or far i was.
1. This picture is of my little sister. She is sniffing a flower that is bigger than her face. In the background you can see the houses and the rocks she is standing on.
2. This image uses forced perspective by using 2 subjects. My sister is the smaller subject in this picture. The flower is the bigger subject.
3. I made this image by putting the flower closer to my camera. Then I had my little sister stand a little further away. When she was a good distance i made her act like she was sniffing the flower.
4. This picture wasn't that hard to create. All i had to worry about was how to avoid getting the sun in my image. I didn't want my picture to be too bright.
5. Distance affected this image because if she was closer to the camera her face would look the same size as the flower. Then it really wouldn't use forced perspective.
_JPG.jpg)

1. This picture is of my little sisters friend. She is posing just like my little sister. She is acting as if she were smelling the flower that is bigger than her face.
2. This image uses forced perspective because like in the image above my sisters friend is the smaller subject. Meanwhile the flower is the bigger subject.
3. I created this image a little bit differently. I made my sisters friend pose first and then i placed the flower closer to my camera. After everything was placed perfectly i made her act like she was sniffing the flower.
4. Like i said in the other image, this was not hard to create. All I had to worry about was the camera focusing on the sun. I didn't want the subject too be too dark.
5. Distance affected this image by perfect placing. I had to make sure the flower was close enough to the camera to look bigger. I also had to make her stand so far back that she looks small.
1. This picture is of my little sister and her friend. They are about to be suffocated by a giant flower. They are bent down trying to avoid the damage they are about to receive.
2. This image uses forced perspective by making my littler sister and her friend look small. While the flower looks really big. So big that it can crush them.
3. I created this image by having my little sister and her friend stand in the rocks


Advanced Lighting


Independent Project #1(Polaroids)


After Questions:
1. I mainly shot pictures of plants because it was the easiest. I would go to home depot or Walmart and take pictures of the plants that they had outside. I tried to take pictures of people but it just didn't look the same. Some pictures I took were when I went for a hike.
2. To get these images, I would take a picture of something (in my case it was a plant). Then I would take a picture with my hand in it holding a polaroid. When it was time to edit i would have to open both of my pictures. Then in the picture of my hand i would cut it out and place it on the original image.
3. The tools I used for editing my image were pretty basic. I used the quick selection tool to cut my hand out and place it on the other image. I also used the paint brush to color certain things in the image to make it stand out. Finally I used the paint bucket to make the image look a little old fashion, but still modern.
4. I learned that shooting these kinds of images are not very easy. It takes a lot of work and patience. If you're too close the image will come out blurry. But if you're too far your subject won't be in the image. I also learned that there were short cuts so that your image would look like it was actually a polaroid. (Thanks mrs.caruso!)
5. These kinds of images are not easy to shoot. It was even harder that i had to do it on my own and i couldn't ask mrs. At first I tried getting everything in one picture but it would come out too blurry. Once I learned the short cut it made everything way easier.
6. I feel like my images could have came out better. But for them being the first time ever that i shot like this they came out pretty decent. I just feel like I did not have enough time to shoot because of how stubborn my images were being. After editing everything they came out ok. They just didn't look like how i expected them to.
7. For my next independent project I would really love to do neon lights. The only problem with that right now is how cold it is. I really hate the cold and I don't know if i would want to walk around at night in the cold taking photos. So maybe i will save that for when it gets warmer. Im also thinking of taking portraits of friends for my next project.
Independent Project #2 (Creepy Pictures)


After Questions:
1. This independent project i decided to go with creepy pictures. I chose this because its different and i really like creepy things. I just wish i did this project closer to Halloween because I could have bought costumes and fake blood. It would have been easier to get ideas as well.
2. For the images i would just have my little sister pose and then i would take the shot and then edit it. For some images I went to the cemetery (i know thats kinda weird) But i wanted them to be realistic. For other images I just took pictures at home in my bathtub or infant of a wall. Then in the last few images i took them at a store where they have creepy dolls.
3. For mostly all of my images, i used the paint bucket to change the images to look black and white in order to get the creepy affect. I also used the lasso tool a lot so that i can get one image onto my original photo.
4. What I learned about this style of photography is that you need to do it closer to Halloween so that you can have more props. I didn't have props so i had to use a lot of photoshop. I also learned that these type os images require a looooot of editing. Thats why towards the last few images they look like a mess.
5. The setting of my images were difficult. I didn't quite know where i wanted to take pictures or if would even look good. Also the editing because i would have an idea in my head. Then i would try it and it would look very bad.
6. I think most of my images came out really good. I really liked the first few. The last ones were rushed because i had to turn them in. I was worried i wouldn't get them in on time.
7. For my next project i think I'm gonna go with street art. I love to look at graffiti. It will allow me to drive around town and look for things. Then I will get to see the parts of town that maybe a lot of people have never seen.
Independent Project #3 (Street Art)


After Questions:
1. I chose to shoot street art for this independent project. The reason i chose this was so that i can go around the city and explore. I have also always really enjoyed street art. Getting to shoot these images was so much fun because me, my mom and my little sister all went on a little trip to explore.
2. To get these images, i had my mom drive around nob hill, down town, back streets. While she was in control of the wheel, my sister and i were in charge of looking outside the windows to see if we find anything. After we found some places we got down and explored by foot.
3. The only editing i needed for these images was to change the colors and crop. I liked the way the original images looked so all i needed to do was add more colors. The crop was used to get what ever i didn't want in the image out.
4. I learned that there is so much street art out there. The really pretty and unique ones are hidden where most people won't be able to see them. I also learned how talented so many people are.
5. There was nothing difficult about shooting these images. I think the only thing would be having to drive around and find them. I didn't want the ones people have seen before. I wanted to find the hidden ones. The unique ones that never get the attention they deserve!
6. Overall, i think these images came out really good. I love the colors. Some images look a little bit slanted but they are still cool. i don't really think there is a wrong way to shoot these images. I liked this project the most. I believe these were my best ones so far.
7. For my next independent project i am thinking of shooting bubbles as well as glitter. I always try to choose photo ideas that are unique. I don't want Mrs. Caruso to keep seeing the same style of photography.
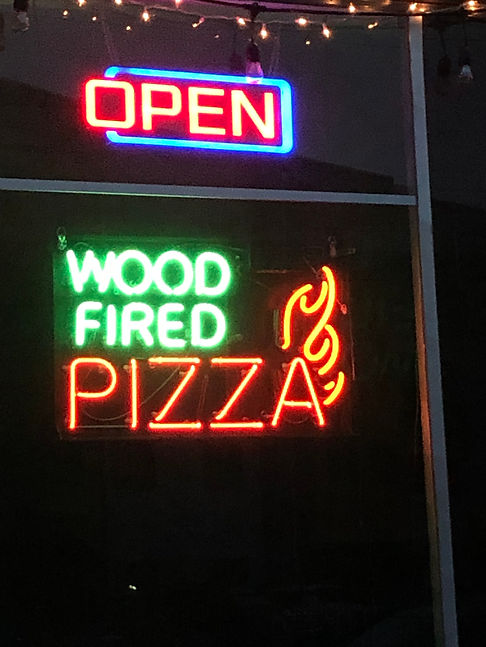
Independent Project #4 (Neon Signs)


After Questions
1. I chose to do neon lights for this project. The reason I decided to do this was because my SD card got ruined and all of my other images were erased. I thought about doing this project all year but it was too cold to walk around and shoot these images. Finally after my other pictures were gone, I decided to do this because it was an easy way to make up the lost images.
2. To get these images, I had to wait until sundown. Once the sun went down and it was sort of dark I drove to Nob Hill and downtown to see the signs. Once I found the signs I liked, I messed with the camera settings. I had to act as if I were in the black box and mess with the camera like we did in there.
3. I just colored most of these images. I think they needed this type of editing because they were a little bit too bright. I though that by coloring them it would mellow the bright colors out a little bit. This actually worked because now they are not as bright as they originally were.
4. I learned that these images require a lot of patience. I know its pretty surprising but you have to wait for the sun to go down. Then you have to fight with traffic (since downtown and nob hill are always packed on the weekends) I also had to wait patiently in order to find a parking. Once I did I had to figure out how to use the settings and get the perfect picture.
5. The only thing that was difficult about taking these pictures were the fact that you have to mess with the shutter. Other than that though I didn't find these images hard to shoot. These were actually pretty easy. This is why I chose to shoot these and not make up the ones I lost.
6. I feel like these images are pretty decent! I feel as though they could be a little bit better. I could have done more editing but I was rushed. I know its my fault for not making these images up sooner. But I feel like they are decent despite the fact that I had to mess with the camera a lot.
7. For my next project I think I am going to shoot some more creepy dolls. On my 3rd independent project Mrs.Caruso loved the little bit that I put on my website so I though why not give her more of these images?
Independent Project #5 (Creepy Dolls)


After Questions
1. For independent project #5 I decided to take pictures of creepy dolls.The reason I chose this was because everyone loved the little bit I had for project #3. I also love Strange Factory (a store in nob hill). So shooting these images gave me an excuse to go there!!
2. To get these images I had to make sure I went before the store closed! It kind of sucked because I would come to shoot these images but since they close at 6 I would go back home and have to wait until the sun went down to get my neon light images.
3. I'm not going to lie. I did not edit these pictures. I had no time to edit them. I know it's my fault for not getting them in on time. But for there not being any editing done to these images I think the look pretty decent.
4. I learned that these images are pretty easy to shoot. All you have to do is point and shoot. There was no special thing I had to do to get these images. Besides having to actually go to the store.
5. The most difficult thing about shooting these images was the fact that I was able to move the dolls around. All throughout the store it has "Please Do Not Touch" signs. So I was not able to move other dolls out of the way.
6. I think that they came out pretty good. I'm not sure how these images are supposed to look but I like them. They're weird and different.
7. No idea! There's no time for any more projects!
